Harvesting rainwater
Harvesting rainwater using a plastic bag, 2 elastic bands and a length of tubing
I wanted a quick, simple and cheap DIY way to harvest rainwater while I thought about a more permanent, elegant solution. I looked on the internet but I could not find anything I liked. I did not want to let the opportunity of harvesting rainwater pass me by while I got my act together to do something 'meaningful'. (Think rainwater tank; think expensive.)
This is my quick DIY solution to harvest and store rainwater. I don't imagine that it will last very well but I can replace the elastic bands and plastic bag easily while I think of a better solution! This is what I did.
My quick, cheap, DIY solution
2nd You will need:
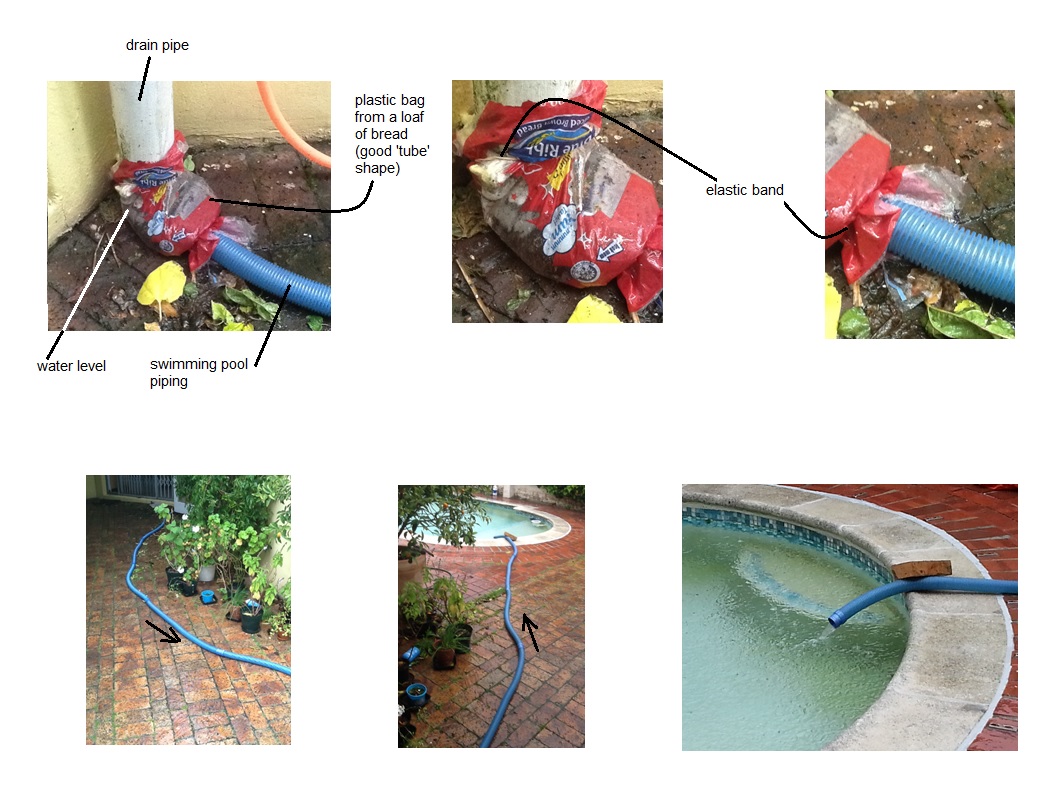
Step 1: Get hold of a plastic bag that a loaf of bread comes in. This shape of bag is a good one. Not too narrow, and not too wide. Cut open the bottom of the bag so that you are left with a tube rather than a bag.
Step 2: Get hold of 2 elastic bands. Pull the one end of the plastic bag through one elastic band (or the bigger band if you have two sizes) so that about 10 cm of bag goes through the loop.
Step 3: Slide this end of the bag over the drainpipe and then slide the elastic band over the pipe to keep the bag in place.
Step 4: Get the 2nd elastic band. If your 2nd band is the same size as your first one (mine was) you need to make it into a double loop (because the piping that transports the water away from the drainpipe is quite narrow and you want the elastic band to fit tightly around the piping to prevent leaks). Pull the other end of the plastic bag through this elastic band. Again, 10 cm will be enough.
Step 5: Slide the plastic bag over the piping and then slide the elastic band up and over the end of the pipe to fix the bag in place.
Step 6: Run the piping to the point where you want to collect the water. In my case, I could pipe the water to a pool. In this way, I could use harvested water for the pool rather than municipal water.
Step 7: Stand back, and admire your work!
- plastic bag that used to contain a loaf of bread (or any long, narrow plastic bag)
- elastic band that will fit tightly around the drainpipe (mine was about 3 mm wide and about 7 cm long when flattened but not pulled)
- another elastic band that will fit tightly around the piping that will carry the water away to the storage point (I used the same type of band here as I used for the drainpipe – I just doubled it back on itself))
- piping to carry the water away to the storage point (I used old swimming pool piping).
Step 1: Get hold of a plastic bag that a loaf of bread comes in. This shape of bag is a good one. Not too narrow, and not too wide. Cut open the bottom of the bag so that you are left with a tube rather than a bag.
Step 2: Get hold of 2 elastic bands. Pull the one end of the plastic bag through one elastic band (or the bigger band if you have two sizes) so that about 10 cm of bag goes through the loop.
Step 3: Slide this end of the bag over the drainpipe and then slide the elastic band over the pipe to keep the bag in place.
Step 4: Get the 2nd elastic band. If your 2nd band is the same size as your first one (mine was) you need to make it into a double loop (because the piping that transports the water away from the drainpipe is quite narrow and you want the elastic band to fit tightly around the piping to prevent leaks). Pull the other end of the plastic bag through this elastic band. Again, 10 cm will be enough.
Step 5: Slide the plastic bag over the piping and then slide the elastic band up and over the end of the pipe to fix the bag in place.
Step 6: Run the piping to the point where you want to collect the water. In my case, I could pipe the water to a pool. In this way, I could use harvested water for the pool rather than municipal water.
Step 7: Stand back, and admire your work!
Update
After a few rainfalls, I noticed that the plastic bag had filled up with leaves from the roof's gutter. I 'disconnected' the elastic band from the end around the piping transporting the water away from the drainpipe because this connection was easier to reach. I removed the leaves from the bag easily and reconnected the plastic bag to the piping. The water was soon flowing again!
By the way, it is now five years later and I am STILL using this system! Yes, I had to replace the bag and the elastic bands from time to time but it works so well (for me) that I have not bothered to come up with a 'proper' solution!
